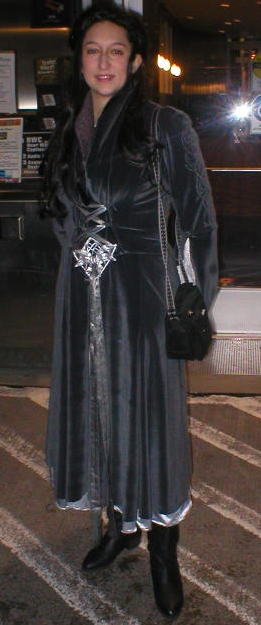
Arwen's Chase Dress
Costume Detail
Please note: You
may choose different fabrics for your version of this dress.
I have on hand several microsuedes, a lovely ultrasuede and a cottony
velveteen. A non-stretch version of
this dress would close at center front with hooks and eyes or a hidden zipper.
 Arwen’s
Chase Dress (Version 1) The dress began life based on Vogue 1290, but I ended up
not really using the pattern except for the skirt pieces. The dress is made from
grey velvet, which I purchased with great excitement in the Sari district of
Vancouver, BC. It being the only grey material even vaguely appropriate I’d
seen all day, I didn’t even check for stretchiness. Oops…. it is a 4-way
stretch velvet. Makes for an awfully comfortable dress, but after wearing it a
couple of times, I’m already scheming how to make a new one of something that
doesn’t stretch (hence the version 1, above). The outer material is grey
stretch velvet, lined with dark grey satin. The underskirts are light grey
lightweight polyester satin. I found a remnant of white crinkly sheer fabric for
the lower undersleeves. The best find was a piece of UGLY lavender polyester in
the fabric stash from my Nana, with a perfect raised thread pattern for the
collar lining. I knew that 100% polyester wouldn’t dye all that well, but I
went ahead and let it sit in black RIT dye for about 30 minutes. After the
rinsing and the drying, it looked pretty good—a definitely purple grey color
that ties in with the leggings.
Arwen’s
Chase Dress (Version 1) The dress began life based on Vogue 1290, but I ended up
not really using the pattern except for the skirt pieces. The dress is made from
grey velvet, which I purchased with great excitement in the Sari district of
Vancouver, BC. It being the only grey material even vaguely appropriate I’d
seen all day, I didn’t even check for stretchiness. Oops…. it is a 4-way
stretch velvet. Makes for an awfully comfortable dress, but after wearing it a
couple of times, I’m already scheming how to make a new one of something that
doesn’t stretch (hence the version 1, above). The outer material is grey
stretch velvet, lined with dark grey satin. The underskirts are light grey
lightweight polyester satin. I found a remnant of white crinkly sheer fabric for
the lower undersleeves. The best find was a piece of UGLY lavender polyester in
the fabric stash from my Nana, with a perfect raised thread pattern for the
collar lining. I knew that 100% polyester wouldn’t dye all that well, but I
went ahead and let it sit in black RIT dye for about 30 minutes. After the
rinsing and the drying, it looked pretty good—a definitely purple grey color
that ties in with the leggings. 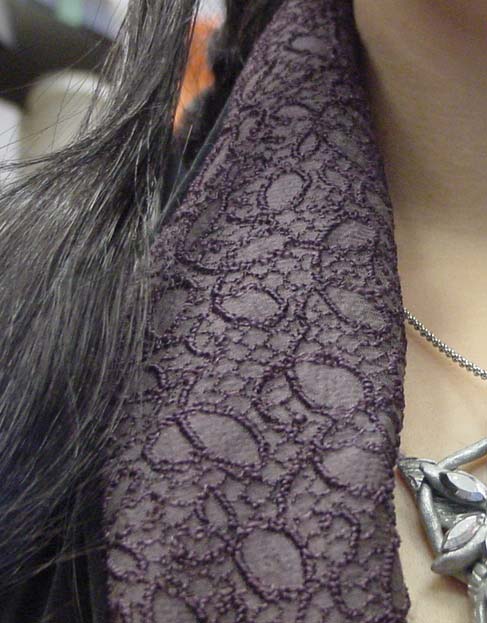 Fabrics assembled, I started on the construction. I cut the pattern
pieces for Vogue 1290 in two at the waistline, leaving me with bodice pieces and
skirt pieces. I made a muslin of the bodice, drew lines where I wanted the
princess seams to be (from shoulder instead of armscye) and remade it. All good.
Then I started reading about the rolled collar. I had planned to make a collar
piece and sew it on. I printed out the instructions and went at it. First
attempt: Bad. Second attempt: the collar looked good from the back and horrible
from the front. Third attempt: took it with me to Maine (I live in WA state)
when I visited my parents. Even with Mom’s help, we just weren’t getting it
to look right. When I got home, I looked through my costume closet and found an
old jacket that had a collar that looked right, when I stood it up against my
neck, instead of letting it lay flat as it should. I ripped the old jacket apart
at the seams and used it for a pattern. Voila! Success! Finally ready to cut
into my velvet, I put together the bodice and made a lining as well. I added
small fabric loops along the front princess seams (3 to a side) and back
princess seams (just one to a side). For the collar, once I had the right shape
for my body, I continued following the AlleyCatScratch
instructions, sewed together the front bodice pieces, the dyed lining and two
layers of stiff interfacing in between. I used the old jacket’s sleeves for a
pattern too, since the armhole now was sized a little differently than the Vogue
pattern. I also cut off the pattern at the elbow. I made a lower sleeve petal of
velvet and lined it with the dark grey satin. Before I sewed the sleeve parts
together and to the bodice, I drew freehand the design for the sleeve
embroidery, based on drawings in The Art of FOTR, on a piece of backing
paper (Sulky Stiffy). I then traced a mirror image of that design on a second
piece of paper. These I pinned to the wrong side of my sleeves and simply
followed the design, with silver thread, on my sewing machine.
Fabrics assembled, I started on the construction. I cut the pattern
pieces for Vogue 1290 in two at the waistline, leaving me with bodice pieces and
skirt pieces. I made a muslin of the bodice, drew lines where I wanted the
princess seams to be (from shoulder instead of armscye) and remade it. All good.
Then I started reading about the rolled collar. I had planned to make a collar
piece and sew it on. I printed out the instructions and went at it. First
attempt: Bad. Second attempt: the collar looked good from the back and horrible
from the front. Third attempt: took it with me to Maine (I live in WA state)
when I visited my parents. Even with Mom’s help, we just weren’t getting it
to look right. When I got home, I looked through my costume closet and found an
old jacket that had a collar that looked right, when I stood it up against my
neck, instead of letting it lay flat as it should. I ripped the old jacket apart
at the seams and used it for a pattern. Voila! Success! Finally ready to cut
into my velvet, I put together the bodice and made a lining as well. I added
small fabric loops along the front princess seams (3 to a side) and back
princess seams (just one to a side). For the collar, once I had the right shape
for my body, I continued following the AlleyCatScratch
instructions, sewed together the front bodice pieces, the dyed lining and two
layers of stiff interfacing in between. I used the old jacket’s sleeves for a
pattern too, since the armhole now was sized a little differently than the Vogue
pattern. I also cut off the pattern at the elbow. I made a lower sleeve petal of
velvet and lined it with the dark grey satin. Before I sewed the sleeve parts
together and to the bodice, I drew freehand the design for the sleeve
embroidery, based on drawings in The Art of FOTR, on a piece of backing
paper (Sulky Stiffy). I then traced a mirror image of that design on a second
piece of paper. These I pinned to the wrong side of my sleeves and simply
followed the design, with silver thread, on my sewing machine.  I ripped off the excess paper then lined the sleeves with the dark
grey satin. I attached the lower sleeve petals and the white sheer undersleeve
at the same time, then handstitched the upper sleeve lining over the seam, so it
all looks nice inside. Last stage of the sleeve was to attach it to the bodice.
On to the skirt! I liked the shape of the Vogue 1290 skirt, so I used those
pattern pieces. I divided the overskirt into four panels, and the underskirt
into only two panels. Luckily the stretch velvet didn’t fray, so no need to
hem the overskirt. I left the underskirt slightly longer and hemmed it with a
rolled hem. I stitched the two skirt layers to each other at the waistline, then
attached the whole thing to the bodice. Again, the bodice lining was
handstitched down over the seam to make a nice inside finish. I made some long
ribbons of grey satin for the front and back sashes. The final touches were
small silver trim around the lower edge of the undersleeves, stretch velvet
gloves (just traced my hand, added a seam allowance, and machine sewed –
couldn’t have done it so quickly with any other fabric…), and of course, the
jewelry. The Evenstar and the belt buckle
I ripped off the excess paper then lined the sleeves with the dark
grey satin. I attached the lower sleeve petals and the white sheer undersleeve
at the same time, then handstitched the upper sleeve lining over the seam, so it
all looks nice inside. Last stage of the sleeve was to attach it to the bodice.
On to the skirt! I liked the shape of the Vogue 1290 skirt, so I used those
pattern pieces. I divided the overskirt into four panels, and the underskirt
into only two panels. Luckily the stretch velvet didn’t fray, so no need to
hem the overskirt. I left the underskirt slightly longer and hemmed it with a
rolled hem. I stitched the two skirt layers to each other at the waistline, then
attached the whole thing to the bodice. Again, the bodice lining was
handstitched down over the seam to make a nice inside finish. I made some long
ribbons of grey satin for the front and back sashes. The final touches were
small silver trim around the lower edge of the undersleeves, stretch velvet
gloves (just traced my hand, added a seam allowance, and machine sewed –
couldn’t have done it so quickly with any other fabric…), and of course, the
jewelry. The Evenstar and the belt buckle 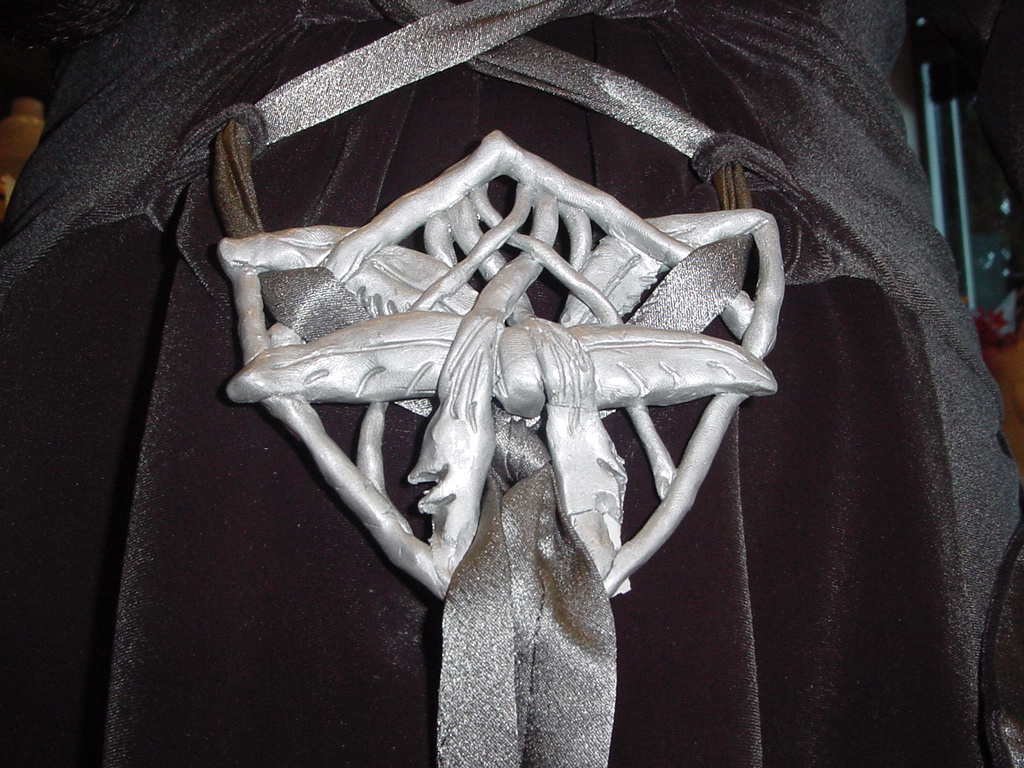 were made from Sculpey, wire, and a few bits of old jewelry from my stash. I
painted them with metallic silver acrylic paint and a coat of clear nail polish
for a little shine. Boots and pants from a second hand store. Wig is the
“Sabrina” wig from Wilshire Wigs,
braided and styled appropriately.
were made from Sculpey, wire, and a few bits of old jewelry from my stash. I
painted them with metallic silver acrylic paint and a coat of clear nail polish
for a little shine. Boots and pants from a second hand store. Wig is the
“Sabrina” wig from Wilshire Wigs,
braided and styled appropriately.
 Back to Chase Dress Costume Main Page
Home |
Costumes |
Ordering |
Contact Us